Wednesday, April 24, 2013

Soot and Spit | Particles in Isadora

Holy challenges Batman. It seems like I'm constantly being humbled by the learning curve of graduate school. This spring one of ASU's productions is Charles Mee's Soot and Spit. 


Soot and Spit is grounded in the work of James Castle, an artist who was deaf and possibly autistic. One of the most powerful outlets for expression in Castle's life was making art. He made countless works over the course of his life, and one of the mediums that he used was a mixture of soot and spit. With this as a contextual anchor the lead designer, Boyd Branch, was interested in exploring the possibility of using particles as a part of his final design. 

One of my charges in working on this production was to explore how to work with particles in Isadora (our planned play-back system). I started this process by doing a little digging on the web for examples, and the most useful resource that I found as a starting point was the Mark Coniglio (Isadora's creator) example file. Here Mark has a very helpful breakdown of several different kinds of typical operations in Isadora, including a particle system. Looking at the Particle System Actor can feel a little daunting. In my case, The typical approach of toggling and noodling with values to look for changes wasn't really producing any valuable results. It wasn't until I took a close look at Mark's example patch that I was able to finally make some head way.
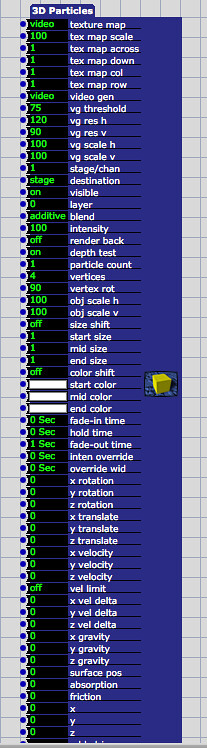
We can start by looking at the 3D particle actor and working through a few important considerations to keep in mind when working with 3D particles in Isadora. One thing to remember is that when you're creating particles, the rendering system needs multiple attributes for each particle that you're generating (location in x, y, and z, velocity, scale, rotation, orientation, color, lifespan, and so on). To borrow a idiomatic convention from MaxMSP, you have to bang on these attributes for every particle that you create. There are a variety of methods for generating your bang, but for the sake of seeing some consistent particle generation I started by using a pulse generator. Pulse generators in Isadora are expressed in hertz (cycles per second), and when we're working with our particle system we'll frequently want a pulse generator to be attached at the front end of our triggers. To that end, we really want a single pulse generator to be driving as much of our particle generation as possible. This is to ensure all of our data about particle generation is synchronized, and to keep our system over head as low as possible. 

Let's get this party started by making some conceptual plans about how we want to experiment with particles. I started by thinking of the particles as being emitted from a single source and being affected by gravity in a typical manner, i.e. falling towards the ground. 

Here's my basic particle emitter set-up for this kind of setup:
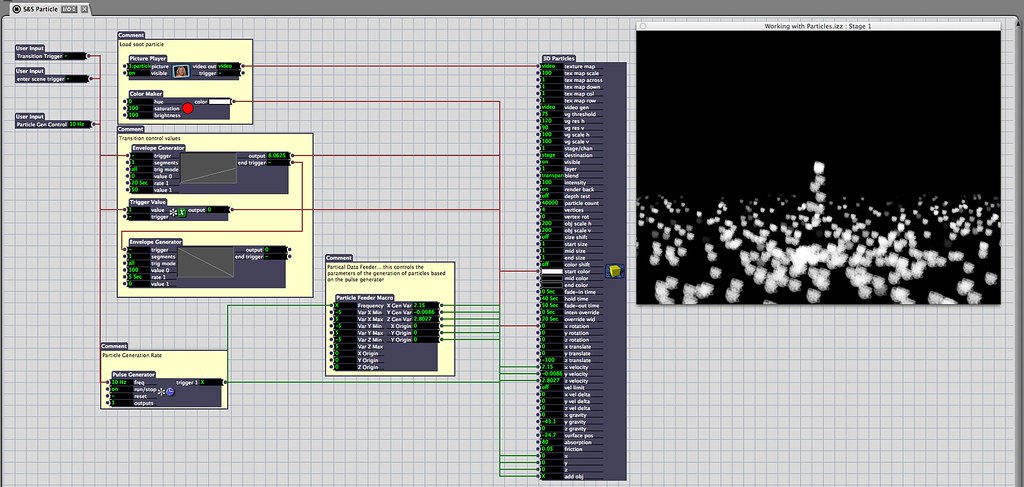


Let's start by taking a look at the things we need to get started. As I mentioned before we need to start by frist getting a pulse generator set-up. Let's start by adding a pulse generator, and looking at where it's connected:


Here we can see that the pulse generator is hooked up to a custom user actor that I've called "Particle Feeder," and to the "Add Obj" attribute in the 3D particle Actor. This approach is making sure that we're only using a single pulse generator to bang on our particle system - pushing attribute changes and add object changes.

Next let's look at the Particle Feeder actor that I made to make this process easier:
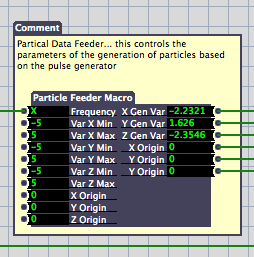

In just a moment we'll take a look inside of this user actor, but before we dive inside let's examine how we're feeding the particle generator some information. Frequency is the input for the pulse generator, this is how quickly we're generating particles. Var X, Y, and Z are used to generate a random range of velocities for our particles between an upper and lower limit. This makes sure that our particles aren't uniform in how they're moving in the space. If we don't have any variation here our particles will all behave the same way. Finally we have a location for our emitter's location: Origin X, Y, and Z. It's important to remember that the particle system exists in 3D space, so we need three attributes to define it's location. On the right side of the actor we can see that we're passing out random values between our min and max values for X, Y, and Z as well as a X, Y, and Z origin data. 

Inside of this custom actor we see this:
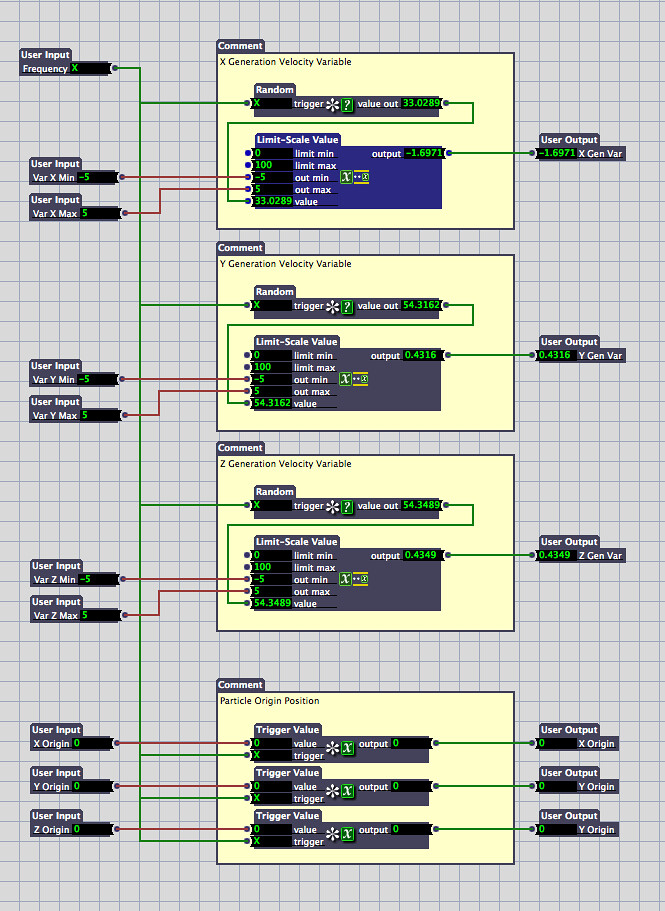


At first glance we can see that we have four blocks of interest for this actor. First off it's important to notice that our Frequency input is passed to all of our modules. The first three modules are copies of one another (one for X, Y, and Z). We can see here that our pulse generator is banging on a random number generation actor, that random value (from 0 to 100) is then passed to a Limit-Scale Value actor. The limit scale actor takes an input value in a specified range and scales it to another range. In our case it's taking values between 0 and 100 and scaling them to be between -5 and 5. The resulting value is then passed out of this macro to it's corresponding value.  Our bottom block pushing out data about our emitter location. It's important to remember that we need to pass out the origin location for each particle that's generated. This is why the location information is passed through a trigger value that's being triggered by our systems pulse generator.

If we jump back out of our user actor can see how our input parameters are then passed to the 3D particle actor:
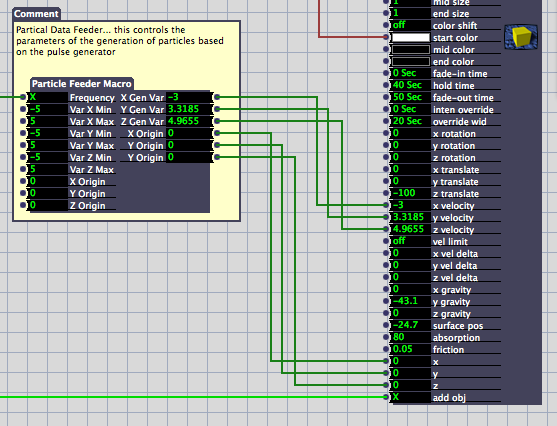


Ultimately, you'll need to do your own experimenting with particle systems in order to get a firm handle on how they work. I found it useful to use custom actors to tidy up the patch and make sense of what was actually happening. I think the best way to work with particles is to get something up and running, and then to start by changing single attributes to see what kind of impact your change is making. If you're not seeing any changes you may try passing your value through a trigger that's attached to your pulse generator - remember that some attributes need to be passed to each particle that's generated. 

Are some of these pictures too small to read? You can see larger versions on flickr by looking in this album: Grad School Documentation. 


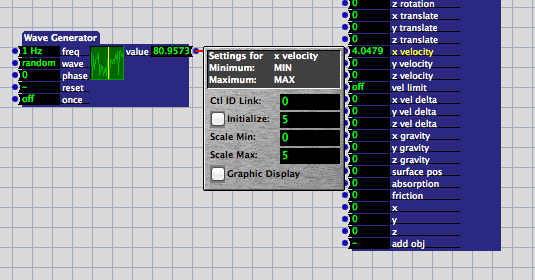
One of the great joys of sharing your work is the opportunity to learn from others. John Collingswood (for more about John check out dbini industries and Taikabox), pointed out on Facebook that one of the very handy things you can do in isadora is to constrain values by setting the range of an input parameter. For example, I could forgo the min-max system set-up with my user actor and instead scale and constrain random values in the 3D particle input. When you click on the name of an input on an actor your get a small pop-up window which allows you to specify parameters for that input's range and starting values. This means that you could connect a wave generator (with the wave pattern set to random) to an input on a 3D particle actor and then control the range of scaled values with the 3D particle actor. That would look something like this:

Monday, April 22, 2013

TouchDesigner | The Underlying Geometry

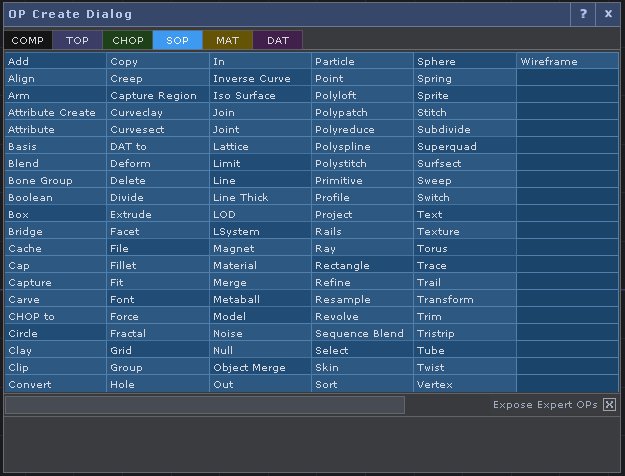
One of the benefits of working with TouchDesigner is the ability to work in 3D. 3D objects are in the family of operators called SOPs - Surface Operators. One of the aesthetic directions that I wanted to explore was the feeling of looking into a long box. The world inside of this box would be characterized by examining artifacts as either particles or waves with a vaguely dual-slit kind of suggestion. With that as a starting point I headed into making the container for these worlds of particles and waves.


Before making any 3D content it's important to know how TouchDesigner processes these objects in order to display them. On their own, Surface Operators can't be displayed as a rendered texture. In TouchDesigner's idiom textures are two-dimension surfaces, and it follows that the objects that live in that category are called TOPs, Texture Operators. Operators from different families can't be directly connected with patch chords. In order to pass the information from a SOP to a TOP one must use a TOP called a Render. The Render TOP must be connected to three COMPs (Compositions) in order to create an image that can be displayed. The render TOP requires a Geometry COMP (something to be rendered), a Light COMP (something to illuminate the scene), and a Camera COMP (the perspective from which the object is to rendered). In this respect TD pulls from conventions familiar to anyone who has worked with Adobe's After Effects. 

Knowing the component pieces required in order to successfully render a 3D object it's easier to understand how I started to create the underlying geometry. The Geometry COMP is essentially a container object (with some special attributes) that holds the SOPs responsible for passing a surface to the Render TOP. The default Geometry COMP contains a torus as a geometry. 


We can learn a little about how the COMP is working by taking a look inside of the Geometry object. 


Here the things to pay close attention to are the two flags on the torus object. You'll notice in the bottom right corner there is a purple and a blue circle that are illuminated. The purple circle is a "Render Flag" and tells TouchDesigner to render the object, and the blue circle is a "Display Flag" which tells TouchDesigner that this is the object that should be displayed in the Geometry COMP.

Let's take a look at the network that I created.


Now let's dissect how my geometry network is actually working. At first glance we can see that multiple objects are being combined into a single piece of geometry that's ultimately being passed out of this Geometry COMP. 


If we look closer we'll see that here that the SOP network looks like this:
Grid - Noise - Transform - Alpha Noise (here the bypass flag is turned on)
Grid creates a plane that's created out of polygons. This is different from a rectangle that's only composed four points. In order to create a surface that can deform I needed a SOP points in the middle of it. The grid is attached to a Noise SOP that's animating the surface. Noise is attached to a transform SOP that allows me to change the position of this individual plane. The last stop in this chain is another Noise SOP. Originally I was experimenting with varying the transparency of the surface. Ultimately, I decided to move away from this look. Rather than cutting this out of the chain, I simply turned on the Bypass Flag which turns off this single SOP. This whole chain is repeated eight times (for a total of eight grids). 


These Nine planes are then connected so that the rest of the network looks like this:
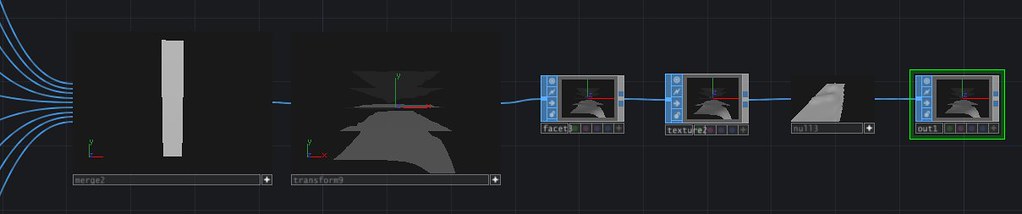
Merge - Transform - Facet - Texture - Null - Out
Merge takes all of the inputs and puts them together into a single piece of geometry. Transform allows me to move object as a whole in space. Facet is a handy operator that allows you to compute the normals' of a geometry, which is useful for creating some more dynamic shading. Texture was useful for another direction that I was exploring, ultimately  ended up turning on the bypass flag for this SOP. A null, like in other environments, is really just a place holder kind of object. In the idiomatic structure of TouchDesigner, the Null is operationally an object that one places at the end of operation string. This is considered a best practice for a number of reasons. High on the list of reasons to end a string in a Null is because this allows easy access for making changes to a string. TouchDesigner allows the programmer to insert operations between objects. By always ending a string in a Null it becomes very easy to make changes to the stream without having to worry about re-exporting parameters. Finally all of this ends in an Out. While the Out isn't necessary for this string, at one point I wasn't sure if I was going to pass this geometry into another component. Ending in the Out ensured that I would have that flexibility if I needed it.

Sunday, April 21, 2013

TouchDesigner | Time Trigger

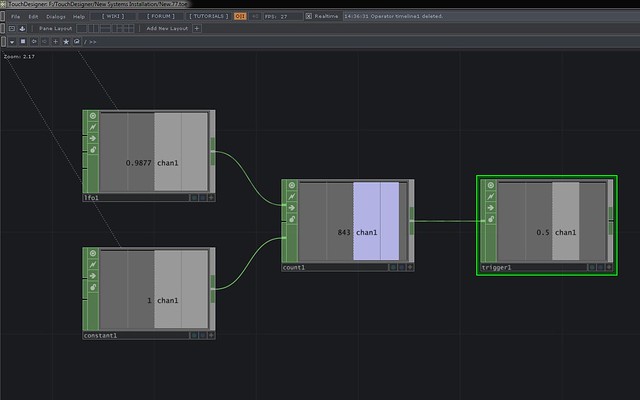
Ultimately I don't know how practical this method is, but at the moment it feels like a victory. Creating a time based trigger in TouchDesigner can be accomplished a ton of ways, the method I'm using uses the following CHOPS: LFO, Constant, Count, Trigger. 

The set to the same sample rate as the project will cross 0 once per second. The constant indicates the rate at which you wish to count. Count will use the input from the LFO and the Constant to count at the rate specified by the constant every time the LFO crosses 0. This is attached to a trigger CHOP. The trigger's threshold can e set to to the time (in seconds) appropriate for the transition. Bang. A time based triggering method using four CHOPs.


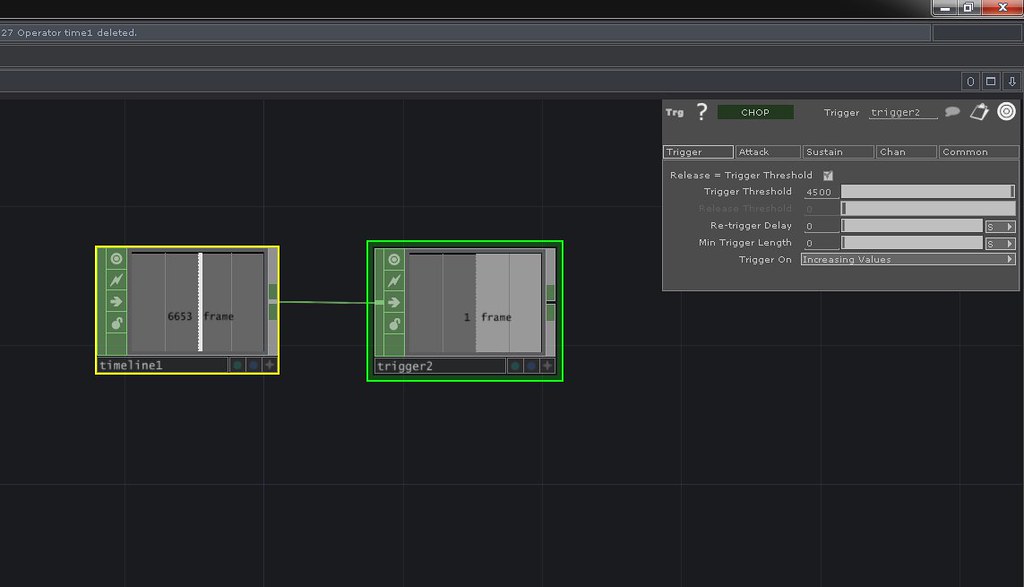
It's also worth nothing that another method for achieving this same  triggering method would be to use just two CHOPs: Timeline and Trigger. The Timeline chop will report out the current position as a frame number. Provided that you know the time (and therefore frame number) you can use this to set the threshold for a trigger value.


Sunday, April 14, 2013

Hardware and Software | Bootcamp Woes


Rough. This whole business is rough.

Curse you Touch Designer, and your allure.

One of the many pieces of software that's caught my eye over the last year has been Derivative's Touch Designer. TD is built around the idea of visual thinking, and is made to run rich visual experiences. It's built to be hardware accelerated in nearly every aspect, and exists somewhere in the space between Isadora, Max MSP, and Quartz Composer. As a nodal based programming environment, it also works within the idiomatic framework of a timeline based system. It might not be the best tool for media designers (at least as we're being trained right now), but it's a glimpse of the future in terms of a tool that's built with the intention for programmer / designers to dream big enough and make just about anything.

Right now TD is a windows only application. For me that means buying a windows based computer / laptop or getting with the program and creating a second partition for Windows on my Macbook Pro. 

My first bout with this idea was rough going. 

I might be a Mac user, but I'm also a frugal Mac user. When I purchased a laptop at the start of the academic year I knew that I was ultimately going to use OWC's Data Doubler to install another hard drive in the traditional 15" body of my 2013 Macbook Pro. I purchased a SSD for applications, and the OS to run off of and did the dance of opening up the case of a fairly new MB Pro. This is far from my first foray into hardware customization, but it was a little daunting given how tightly packed Apple makes its computers. Nerves aside, after watching plenty of tutorials, and making back up copies of my data I worked through the process without too many hiccups. I ended up moving the platter based drive to the optical bay, and placing the SSD in the traditional Hard Drive slot. 

I did all of this about 4 months ago, and it was after this that I decided to get a windows partition up and running. I'm a jealous man when it comes to my SSD space, and consequently I decided that I wanted to install the Windows partition on my platter drive. This proved to be easier said than done. Apple advises users against using Bootcamp to instal windows to anything but the drive in the main slot. Their advice is to remove other drives, install to the destination drive, and then reinstall the other drives. Sound advice that I didn't initially follow. After backing up all of my data I started by trying to install to my second drive out the gate. I didn't manage to get very far here, so I ended up opening the case on the MBP and removing the SSD. Now I was able to get one step further into the Windows installation process, but quickly got stuck again. Windows uses a MBR structure on its boot drives, and OSX uses a GUID table. Part of what Bootcamp does is to do some software magic so that your partitions will play nicely with one another. My platter drive was still set up as GUID, and the windows installer was unable to reformat the drive by itself. I reinstalled the SSD, reformatted the platter drive as NTFS, removed the SSD, and got back to work. This time I was able to make it all the way through the install process. I reinstalled the SSD with the OSX volume, but was unable to boot into anything but windows. No amount of the option key when restarting or using the windows Bootcamp assistant would solve this problem. Finally I had to open the case again, pull out the platter drive, reformat it with another computer, reinstall it, and then I was back in business - albeit with only the OSX volume. 

Feeling gun shy I decided that I wouldn't bother with a windows partition.

Then I started working with TD more and more on a loaned computer. 

So I changed my mind. This time, however, I decided that I would be willing to share my SSD with the windows partition. I made a plan, and set aside some afternoon to get this done. I backed up all of my data and wanted to get to work. Start things process I soon found out that my first trip down Bootcamp lane had left me with a mystery partition that I couldn't delete, and that was blocking the install process. With everything backed up I decided that I would just reformat, do a clean install of Mountain Lion, and start there. With a copy of OSX installed on USB key I went to work, and while I could still boot into my user account, from the USB boot I wasn't able to reformat the drive. Okay, no problem I decided to pull out the drive and reformat it on another computer, start with a blank drive, and install OSX. 

No dice. 
In trying this, I couldn't manage to boot from the USB key at all. 

No dice.
Next up I tried another USB key. 

No dice. 
So I pulled the drive from the computer, then installed a clean image on the drive. I went to restart my MBP with the restored image. 

No dice. 
I connected one computer to another and started the troubled mac in Target disk mode. Here I was able to see the drives in question, and do some adjusting. 

Restart, still no dice. Started in restore mode, and I can't see the SSD anymore. I formatted the old HDD, and installed Mountain Lion. Once Mountain was installed, I was finally able to see the SSD. From here on in the trouble shooting got easier. I reformatted the SSD, cloned the working OS instal over to to the freshly formatted drive, then restored data and settings from a Time Machine backup. From here I followed along with the Bootcamp installation guide. The one hiccup here was that I still had a USB drive attached when I was working through the install process. Using the back arrow to rewind to the beginning of the Windows 7 install process and removing the USB attached drive got me where I needed to go. Finally I had a Windows 7 partition and an OSX volume up and running. 

Touch Down.

From here on in the rest of the process was just about details. I split the larger platter HHD into two partions - one HFS and one NTFS. While the windows partition can see all of the data on my HFS drives, I can't write to them. I'll use the NTFS formatted drive as works space and storage space for the TD work that I'll do. 

I hit a lot of walls in this process, but have learned a lot as well. If nothing else, persistence really is the name of the game some times. I'm also fortunate to have started this process over a weekend this time around instead of late at night. All of the trouble spots I planned for weren't trouble spots at all, it was the things I didn't plan for that ended up being issues. "Life is what happens when you're busy making plans," and in the same way, the hurtles that this kind of work throws my way are often the things I least expected. I don't know that I'm in any hurry to do this whole process again, but it is nice to know that I'm up for the challenge.

Helpful Links During this process:
Getting a "device in use" error when trying to restore an image try this
The Mac Start-Up Manager


Thursday, March 21, 2013

Media Design | Photo Styles Recreation

One of the courses I'm talking this semester is a Media Design course. ASU structures it's courses into three classifications, A, B, and C Sessions. A Sessions course run during the frist half of the semester (the first quarter), B Session courses run the second half the of the semester (the second quarter), and C Session courses run the full length of the semester. The course is a B session course, and is just getting ramped up. The first project is structured around the need that designers frequently face in building assets that are in specific to known period of time. Copy art is one of the many skills that a good media designer needs tucked up his/her sleeve, and this assignment makes a strong case for learning that process. The project directions and results can be found below:

Project Directions:

For this project, please download the zipped folder of 4 images from the BB Assignments section. In this folder, you will find two images of daguerrotypes and two images shot with Kodak Ektachrome film. Please follow the steps below to complete the project.

  • Examine the provided images closely. Research additional images that are also created in this format. Try to identify what features are inartistic to the image. How do these processes effect what subjects can / should be captured with this media?
  • Identify another medium that you will reproduce. Kodachrome? PixelVision? Silent movie stock? Repeat the above process for this additional medium.
  • Keeping in mind what you've learned about the interactions between subject and format, shoot 1 to three photographs that you will transform into faux versions of these three media.
  • You may neat tot spend some time researching photoshop tutorials online.
  • In the case of your self-chose third medium, please track your process, introducing why / how you chose this medium, how / where you researched it,why you think it would be useful, and the steps that yo have taken in the transformation (create a mini-tutorial).

Recreate a Daguerreotype


Recreate an Ektachrome


Recreating the GameBoy Camera with Photoshop and After Effects 

Here's the look I'm trying to emulate:


After looking at the footage closely, here's what I was looking to make sure that I emulated:

  • Image Size: 320 x 280
  • Color
  • Limitation of the sensor / look and feel of the footage
  • Frame Rate 

Here's the quick and dirty break down of the process:

  • Use After Effects to export an image sequence
  • Open Photoshop and create a new Photoshop action (start recording)
  • Convert the image to Grayscale
  • Posterize the image with Levels
  • Use the Mezzotint filter - short lines
  • Use the Mosaic filter - 2 pixels
  • Start the batch process and export the images to another source folder
  • Import image sequence to After Effects
  • Set the frame rate to 10
  • Output the Final

Want to Following along? Here's a quick tutorial about using After Effects and Photoshop to achieve this effect:


Here's where the process gets us:


Tuesday, March 19, 2013

Phase 2 | Halfway House


Media design is an interesting beast in the theatre. Designers are called upon to create digital scenery, interactive installations, abstract imagery, immersive environments, ghost like apparitions, and a whole litany of other illusions or optical candy. The media designer is part system engineer, part installation specialist, and part content creator. This kind of design straddles a very unique part of the theatrical experience as it sits somewhere between the concrete and the ephemeral. We're often asked to create site specific work that relates to the geometry and architecture of the play, and at the same time challenged to explore what can be expressed through sound and light. 


One of the compelling components of ASU's School of Theatre and Film (SoTF) is its commitment to staging new works. In addition to producing works that are tried and true, ASU also encourages its students to create works for the stage. As a part of this commitment  the department has developed a three phase program to serve the process of developing a work for full main-stage production. 
  • Phase 1 - Phase one is between a staged reading and a work-shop production of a play. This phase allows the team to focus on sorting out the nuts and bots of the piece - what is the play / work really addressing  and what are the obstacles that need to be addressed before it moves onto the next stage of production. 
  • Phase 2 - Phase two is a workshop production environment  With a small budget and a design team the production team creates a staged version of the work that operates within strict design constraints. Here the lighting plot is fixed, scenic elements are limited, and media has access to two fixed projectors focused on two fixed screens.  This phase is less about the technical aspects of the production, and more focused on getting the work up in front of an audience so that the writer and director have a chance to get some sense of what direction to move next.
  • Phase 3 - Phase 3 is a full main-stage production of a work. Here there production has a full design team, larger budget, and far fewer constraints on the implementation of the production. 
While productions can skip one of the stages, ideally they are produced in at least one phase (either one or two) before before being put up as a phase three show. 


This semester I was selected to be the media designer on call for the two original works slotted in as Phase 2 productions: Los Santos, and The Halfway House. These two new works are both written by current ASU playwrights, who are invested in receiving some critical and informative feedback bout their work. The beginning part of this process begins with production meetings where directors pitch their visions of the production and start the brainstorming / creating process with the designers. Ultimately,  Los Santos decided against using any media for their production. Halfway House, however, did decide that it wanted some media driven moments in their production. 

My role in this process was to work with the director to find the moments where media could be utilized in the production, film and edit the content, and program the playback system for the short run of the production. After reading through the play a few times I met with Laurelann Porter, the director, to talk about how media could be used for this show. Important to the design process was understanding the limitations of the production. In the case of the Phase 2 productions, the projectors and screens are fixed. This limitation is in part a function of reducing the amount of tech-time, as well as limiting the complications imposed a set and lighting when doing complex projection. Looking at the script I thought the best use of media would be to enhance some of the transition moments in the production. Several of the transitions in the show involve moments where there is action taking place "elsewhere" (this is the language used by the playwright). These moments seemed perfect for media to help illustrate. In meeting with the director we identified the major moments that would benefit from some media presence, and started brainstorming from there.

A large part of the production process is planning and organization. In the case of lighting, sound, and media designers are tasked with identifying the moments when their mediums will be used, and creating a cue sheet. Cue sheets are essentially a set of discretely identified moments that allow a stage manager to give directions about how the show runs. Media, lights, and sound all have their own board operators (actual humans), and the stage manager gives them directions about when to start or stop a given cue. Creating a cue sheet with this fact in mind helps to ensure that a designer has working understanding of how to plan the moments that are being created. My process of reading the script looked like this:
  • 1st time through - for the story and arc of the action
  • 2nd time through - identify possible moments for media
  • 3rd time through - refine the moments start to create a working cue sheet
  • 4th time through - further refinement, label cues, look for problematic moments
After talking with the director and identifying what moments were going to be mediated material, it was time to create a shooting list, and plan for how to use a single afternoon with the actors to record all of the necessary footage for the show. We had one afternoon with the actors to film the transition moments. I worked with the director to determine a shooting order (to make sure that we efficiently used the actors' time), and to identify locations and moments that needed to be captured. From here it was a matter of showing up, setting up, and recording. This transitioned smoothly to the editing process that was a matter of cutting and touching up the footage for the desired look.

The School of Theatre and Film currently have two show control systems at our disposal. Dataton's Watchout4 and Troikatronix's Isadora. Given the timing of the phase 2 productions, I knew that the Isadora machine was going to be available to me for show control. Like MaxMSP, Isadora a is a node-based visual programming environment. Importantly, Isadora is truly designed with performance in mind, and has a few features that therefore make it easier to use in a theatrical production environment. 

Typically a theatrical production requires a additional steps for media that are similar to the lighting process - lensing, and plotting for example. For the Phase two productions  the the shows use a standard lighting and media plot that doesn't change. This means that there's little additional work in terms of projector placement, focusing, masking, and the like that I have to do as a designer. For a larger production I would need to create a system diagram that outlines the placement of computers, projectors, cable, and other system requirements. Additionally, I would need to do the geometry to figure out where to place the projectors to ensure that I had a wide enough throw with my image to cover my desired surfaces, and I would need to work with the lighting designer to determine where on the lighting plot there was room for this equipment. This element of drafting, planning, and system design can easily be taken for granted by new designers but it's easily one of the most important steps in the process as has an effect on how the show looks and runs. With all of the physical components in place, and the media assets created the designer is now looks at programming the playback system. In the case of Isadora this also means designing an interface for the operator.

One of the pressing realities of designing media for a theatrical installation is the need to create playback system knowing that someone unfamiliar with the programming environment will be operating the computer driving the media. ASU's operators are typically undergraduate students that may or may not be technical theatre majors. In some cases an operator may be very familiar with a given programming interface, while others may not have ever run media for a show. Theatre in educational institutions are a wonderful place for students to have an opportunity to learn lots of new tools, and get their feet wet with a number of different technologies. In this respect I think it's incumbent upon the designer to create a patch that has an interface that's as accesible as possible for a new operator. In my case, each moment in the show where there is media playing (a cue) has  corresponding button that triggers the start, playback, and stop for the given video. 

Media is notoriously finicky in live performance. It can be difficult to program, washed out by stage lights, perform poorly if it’s not encoded properly, or any host of other possible problems. In the case of Half Way House, the process went very smoothly. The largest problem had more to do with an equipment failure that pushed back equipment installation than with the editing or programming process. While this is a simple execution of using media in a production, it was valuable for a number for the individuals involved in the process - the director, lighting designer, sound designer, and stage manager to name only a few. There are large questions in the theatre world about the role of media in production - is it just fancy set dressing? how is it actively contributing to telling the story of the show? is it worth the cost? does it have a place in an idiom largely built around the concept of live bodies? And the list goes on. I don’t think that this implementation serves to address any of those questions, but for the production team it did start the process of demystifying the work of including media in a production, and that’s not nothing.


Tools Used
Programming and Playback- Isadora | TrokaTronix
Projector - InFocus HD projector
Video Editing - Adobe After Effects , Adobe Premiere
Image Editing - Adobe Photoshop 
Filming / Documentation - iPhone 4S, Canon 7D, Zoom H4n
Editing Documentation - Adobe Premiere, Adobe After Effects

Monday, March 4, 2013

Emerge | Commons

This year I was fortunate to have the opportunity to contribute to the performance schedule of ASU's conference about art, science, and the future. This is the second year that Emerge has happened at ASU, with the final night being  a culminating festival of performance and art. In the Fall of 2012 I worked with a group of artists to put together a proposal for creating a performance in Neeb Plaza on ASU's campus. This courtyard that sits nestled between Neeb hall, the Art building, and Design houses a new student generated installation called X-Space each year. Looking to solicite the creation of new works, the Herberger institute put out a call for artists interested in organizing a performance that occurs in X-Space. Called X-Act, applicants were asked to consider hw they would use the space and engage the campus. Early in January my team found out that we our proposal, Commons, was selected. One of the stipulations of the grant was that we would have a showing during the final showcase of Emerge. With this news in mind, our team started the process of creating the installation we had proposed. 


One of the elements that our team was committed to realizing was finding a way to integrate projection into the performance on this very geometrically interesting space. I started by measuring the physical dimensions of the space in order to determine the distance required for the projectors that I had available for this project. Using a bit of math one can calculate the throw distance of a projector. Alternatively it's also easy to use Projector Central's Projection Calculator in order to lock down approximate distances that you might need. With the numbers in front of me I was able to start making a plan about potential projector placement, as well as my options for the performance given the constraint of the size of image that I could create. With the limitations of distance roughly mapped out I headed to the space after dark to do some initial tests. The hard truth about the amount of ambient light in the plaza, and the limits of the InFocus projectors meant that I needed to shy away from projecting large in favor of being brighter. The compromise of brightness and size was to map the front surfaces of X-Space. To accomplish this, I needed to connect two projectors with a Matrox TripleHead. This piece of equipment allows for multi-monitor work where the computer sees the two projectors as though they were a single canvas. 


It took about 4 hours to pull of the necessary equipment, install, and focus the projectors. Once I had the projectors up and in place I was finally able to start mapping the surfaces. I had decided early on that I was going to use a piece of software called Modul8 to control my media playback. Modul8 is a VJ software software package that's robust and easy to use. Unlike other pieces of software, Modul8 is more like an instrument than an autonomous agent that can run independently. While there are a bunch of functions that you can automate inside of the software, it's largely built around the idea of live-mixing the media that you're using. In terms of automation, Modul8 allows the operator to use audio input to control a number of playback triggers. For this project the team used a track by DJ Earworm for audio, largely motivated by the desires of the group recruited for the dance performance. One of the additional benefits of Modul8 is it's ability to send Syphon out media. This means that this piece of playback software can be easily integrated with the mapping tool MadMapper. Here it was as important to know what media system (projectors, hardware, and software) I was using, as the conceptual idea around the performance itself. 

Media Diagram

After getting the hardware installed I started mappping the surfaces of X-Space, creating individual quads and masks for each plane. All in all it took me about three hours to create the maps and masks for the architecture. At this point I was finally able to start experimenting with what kind of media I wanted to use, and how I wanted to arrange it in the space. All in all I budgeted about 16 hours to get this project up and running. Implementing the plan I had created ended up taking about 16.5 hours. This meant that I had one night where I worked on this installation until 3:15 AM, and another night where I was working until just before midnight.  We also had a rather unfortunate miscommunication with the Emerge planning staff about this installation, and the importance of having a security guard available to monitor the site over night. Installation started on Thursday evening, and each of the team members took a shift over night to monitor the outdoor equipment. Luckily we ended up with security for the second night, and didn't have to pull any more all-nighters. 


Finally, while this project looked beautiful on the empty space, there was a miscommunication about audience placement and how stanchions were going to be used at the actual event. While the team had discussed the importance of roping off the performance space, that request was lost on the actual event planners. Consequently the audience largely obstructed the projections as they used the actual stage space as seating. Additionally, the space was filled with stage lighting and projectors rented for another performance which only served to wash-out Commons media, and distract audience members. While this was certainly not a failure, it did leave a lot to be desired given the time, planning, and sleepless nights that implementation required. It's just another lessoned learned, even if learned the hard way.


Tools Used
Programming and Playback- Modul8
Mapping - MadMapper
Multi-Monitor Control - Matrox TripleHead2Go Digital
Video Editing - Adobe After Effects
Image Editing - Adobe Photoshop 
Documentation - iPhone 4S, Canon 7D
Editing Documentation - Adobe Premiere, Adobe After Effects


Commons
X-Act Proposal

Ethan Jackson | MSD New Production Innovation | College of Design
Chelsea Pace | MFA Performance | School of Theatre and Film
Kris Pourzal | MFA Dance / School of Dance
Matthew Ragan | MFA Interdisciplinary Digital Media and Performance | School of Theatre and Film & Arts, Media + Engineering

Activating a campus of this size is a challenge. With so many majors across so many schools, it would be impossible to activate the entirety of the campus with only arts students, or any small group of students for that matter. We propose Commons.

We are excited to propose a 100 person ensemble comprised mostly of non-performers. This ensemble would be assembled by the team over the next several months by contacting graduate students and undergraduates from various departments and schools across ASU, both inside and outside of the Herberger Institute. The inattention is that the sample of students would be a proportional and accurate representation of the population of the Tempe Campus student body.

This project is ambitions and we are not ignorant of the challenges presented by gathering an ensemble of this size. The difficulty is doubled with you consider that we intend to bring mostly non-performers into the ensemble. The groundwork fro the process of contacting graduates students to enlist undergraduates from across campus is already being laid through contacts in Preparing Future Faculty and the Graduate and Professional Student Associate. 

The piece inherently activates the campus by reaching out across so many disciplines and getting people together, working together, and making art. The choreography will be created by the team and also crowd sourced from the assembled ensemble and the music (potentially) will b a remix of music surged by the group.

Not to be confused with a flash-mob, Commons will be a collaboration with all 100 performers. Created as an ensemble, the performs will truly have ownership over the piece and more than just regurgitating choreography, the piece will be brought to life by the population of Arizona State University.

The piece will use the X-Space, the cement plaza to the south, and the wall of the building west of the X-Space. When the audience enters the cement courtyard immediately south of the space, the floor will be lit with interactive projections triggered by the movement of the crowd. After the audience has gathered, the ensembles will emerge from the X-Space installation and begin a choreographed sequence. Theatrical lights, projections, and sound will be utilized to create an immersive environment for both the audience and the performers.

As the choreography builds and more performers are added, a live video feed will begin and will be projected several stories high onto the textured wall of the building to the west of the courtyard. THe projection will be live video of the performance and of the the audience.

The piece is approximately 30 minutes in duration and would allow for various groups of students who are professional distanced from performing to express themselves in a performative and expressive way. The piece ends with the performers exiting through the crowd and out onto campus where they will continue to perform choreography for 10 minutes in a space that is significant to their experience at ASU.

Rather than making something with HIDA students that only HIDA students see and perform in, Commons will truly activate the campus to come together, make something, and take it out into their communities across campus.